Tuesday, January 22, 2013

3-tier architecture in asp.net with C#.

Here I will explain about uses of 3-Tier architecture and how to create or implement 3-tier architecture for our project in asp.net.


Advantages of 3-tier architecture:

* It is easy to maintain, modify and understand.


Basically 3-Tier architecture contains 3 layers

1.    Application Layer or Presentation Layer.
2.    Business Access Layer(BALor Business Logic Layer(BLL).
3.    Data Access Layer(DAL).

Here I will explain each layer with simple example that is User Registration.

1. Presentation Layer:

Presentation layer cotains pages like .aspx or windows form where data is presented to the user or input is taken from the user. Below is sample UI design page for user registration.

1. Start a new project and design the page like above.
2. Double click on "submit" button then it redirects to .aspx.cs page (write entire logic here).
3. Add sub-folders and class objects within the App_code folder as shown below, 


Code for Register.aspx.cs:

public partial class Register : System.Web.UI.Page
{
    //create a object for StudentDC
    StudentDC studentDC = new StudentDC();


    protected void SubmitButton_Click(object sender, EventArgs e)
    {
        studentDC.FirstName= FNameTextBox.Text;
        studentDC.LastName = LNameTextBox.Text;
        studentDC.Password = PasswordTextBox.Text;
        studentDC.PhoneNumber = phoneTextBox.Text;
        studentDC.UserName = UserNameTextBox.Text;
        studentDC.Address = AddressTextBox.Text;
        studentDC = StudentBAL.InsertStudentDetails(studentDC);

    }
   
    }
    protected void ResetButton_Click(object sender, EventArgs e)
    {
        FNameTextBox.Text = "";
        LNameTextBox.Text = "";
        PasswordTextBox.Text = "";
        phoneTextBox.Text = "";
        UserNameTextBox.Text = "";
        AddressTextBox.Text ="";

    }
}


4. And we have to Gets and sets this parameters in StudentDC class.

Code for StudentDC.cs:

   public string FirstName { set; get; }
    public string LastName { set; get; }
    public string UserName { set; get; }
    public string PhoneNumber{set;get;}
    public string Address{get;set;}
    public string Password { get; set; }


2. Business Access Layer (BAL) or Business Logic Layer (BLL):


BAL contains business logic, validations or calculations related with the data.This acts as a interface between Application layer and Data Access Layer.


I have already finished form design (Application Layer) now I need to insert user details into database if user click on button 'submit'. Here user entering details regarding  Firstname, Lastname,Username, password, Address, phone. I need to insert all these  parameters to database. Here we are placing all of our database actions into data access layer (DAL) in this case we need to pass all these parameters to data access layers.
In this situation we will write one function and we will pass these  parameters to function like this
String Username= InserDetails (string Username, string Password, string Address, string Firstname, string Lastname, string phone ).

If we need this functionality in another button click there also we need to declare the parameters like string Username, string Password like this rite. If we place all these parameters into one place and use these parameters to pass values from application layer to data access layer by using single object to whenever we require how much coding will reduce think about it for this reason we will create entity layer or property layer this layer comes under sub of group of our Business Logic layer.

Code For StudentBAL.cs:


 public static StudentDC InsertStudentDetails(StudentDC studentDC)

    {

        return StudentDAL.InsertStudentDetails(studentDC);


    }

5. Create object in BAL. The above code acts as a interface between  Application layer and Data Access Layer.


3. Data Access Layer(DAL):


DAL contains methods that helps business layer to connect the data and perform required action, might be returning data or manipulating data (insert, update, delete etc).

Code for StudentDAL:


public class StudentDAL

{

    private static string strcon = ConfigurationManager.ConnectionStrings["ApplicationServices"].ToString();

    private static SqlConnection con = null;

    private static SqlCommand cmd = null;

    private static SqlDataAdapter da = null;

    private static DataSet ds = null;


    internal static StudentDC InsertStudentDetails(StudentDC studentDC)
    {
  //6. create a connection with database and send the attr values to DB. 
        using (con = new SqlConnection(strcon))
        {
            cmd = new SqlCommand()
            {
                Connection = con,
                CommandText = "Proc_StudentInfo",
                CommandType = CommandType.StoredProcedure
            };
            cmd.Parameters.AddWithValue("@FirstName", studentDC.FirstName);
            cmd.Parameters.AddWithValue("@LastName", studentDC.LastName);
            cmd.Parameters.AddWithValue("@UserName", studentDC.UserName);
            cmd.Parameters.AddWithValue("@Password", studentDC.Password);
            cmd.Parameters.AddWithValue("@Address", studentDC.Address);
            cmd.Parameters.AddWithValue("@PhoneNumber", studentDC.PhoneNumber);
            if (con.State == ConnectionState.Closed)
            {
                con.Open();
                cmd.ExecuteNonQuery();
                con.Close();
            }
            return studentDC;
        }
    }


Here I'm getting all the parameters by simply creating InsertStudentDetails. If we create one entity file we can access all parameters through out our project by simply creation of one object for that entity class based on this we can reduce redundancy of code and increase re usability.

 I have created one function InsertStudentDetails and using this one in StudentBAL.CS by simply creating one object of DAL in StudentBAL.CS.

Here you will get one doubt that is why StudentBAL.CS we can use this StudentDAL.CS directly into our code behind  we already discuss Business logic layer provide interface between DAL and Application layer by using this we can maintain consistency to our application.

7. Set the connection string on the web.config file.
8. Run the project.


Read More »

Saturday, January 19, 2013

Basic UI design in android

Begin by creating an Android project. Implement your Android application as normal. Once you have a project set up and the application running, decide under what screen you want to add Button controls to. Perhaps you’ve simply created a new Android project with its default Activity and layout (main.xml). This will work for this tutorial.
I'm doing basic UI design page for registration.

main.xml:

<LinearLayout xmlns:android="http://schemas.android.com/apk/res/android"
    android:layout_width="match_parent"
    android:layout_height="match_parent"
    android:orientation="vertical"  >

    <TextView
        android:id="@+id/textView1"
        android:layout_width="wrap_content"
        android:layout_height="wrap_content"
        android:text="@string/SampleUI"
        android:layout_gravity="center"
        android:layout_marginTop="20dp"
        android:textColor="#000fff"
        android:textAppearance="?android:attr/textAppearanceLarge" />

    <EditText
        android:id="@+id/editText1"
        android:layout_width="match_parent"
        android:layout_height="wrap_content"
        
android:layout_marginTop="10dp"

        android:inputType="textPersonName" 
        android:hint="@string/firstName"
       >

        <requestFocus />
    </EditText>

    <EditText
        android:id="@+id/editText2"
        android:layout_width="match_parent"
        android:layout_height="wrap_content"
       
android:layout_marginTop="10dp"

        android:inputType="textPersonName" 
        android:hint="@string/lastName"/>

    <EditText
        android:id="@+id/editText3"
        android:layout_width="match_parent"
        android:layout_height="wrap_content"
        android:ems="10"
        android:inputType="textEmailAddress" 
        android:layout_marginTop="10dp"
        android:hint="@string/email" />

    <EditText
        android:id="@+id/editText4"
        android:layout_width="match_parent"
        android:layout_height="wrap_content"
        android:ems="10"
        android:inputType="textPassword"
        android:layout_marginTop="10dp"
        android:hint="@string/passwd" />

    <EditText
        android:id="@+id/editText5"
        android:layout_width="match_parent"
        android:layout_height="wrap_content"
        android:ems="10"
        android:inputType="phone" 
        android:layout_marginTop="10dp"
        android:hint="@string/Mobile"/>

    <Button
        android:id="@+id/button1"
        android:layout_width="fill_parent"
        android:layout_height="wrap_content"
        android:text="@string/submit"
        android:textColor="#000fff"
        android:layout_marginTop="20dp" />
    
    </LinearLayout>

And open res->values->Strings.xml file. Copy below code. 

Strings.xml:


<resources>
<string name="app_name">Prakash_BasicUI</string>
    <string name="hello_world">Hello world!</string>
    <string name="menu_settings">Settings</string>
    <string name="SampleUI">Registration</string>
    <string name="firstName">FirstName</string>
    <string name="lastName">LastName</string>
    <string name="email">Email</string>
    <string name="passwd">Password</string>
    <string name="Mobile">Mobile Number</string>
    <string name="submit">Submit</string>
</resources>

Screen will look like this......


Read More »

Friday, January 18, 2013

Create basic web-service (SOAP) using C#.net.

This tutorial explains how we can create basic SOAP Web-Services using  Visual Studio 2010 or 2012.
In Visual Studio 2008, we can create service directly but in VS10 and VS12 that feature was removed.

How to create SOAP Web-Service in VS10 or VS12.

First create new project and select "ASP.NET Web Application" and I'm naming "SampleWebApplication_for_Web-service Demo" to my sample service.

Now Web-Application created like below screen......

Now add web-service to your web-application....

RightClick on Project-> Add->New Item.

Then select Web Service in list. Click Add.


Service added successfully to your application and you can create your own methods now.

And execute it..


SAMPLE METHOD:

First, Create the connection string for your service.

 string Con = ConfigurationManager.ConnectionStrings["SampleWEBConnection"].ToString();
        string sP_Name = string.Empty;
        SqlConnection sqlCon = null;
        SqlCommand sqlCmd; 

Make sure that the same connection string 'name' should be appear in web.config file like below

<add name="SampleWEBConnection" connectionString="Data Source=sample.db.10xxxxx3.hostedresource.com; Initial Catalog=DatabaseName; User ID=DBName; Password=DbPasswd"/>

And you have to add one more thing in web.config file. Web-service won't work without this step. It helps to get and post the data from client to server and vice-versa.
Add it in <system.web/>

<webServices>
      <protocols>
        <add name="HttpGet"/>
        <add name="HttpPost"/>
      </protocols>
    </webServices>

Here I have written one sample Web-Method for Login.
WebMethod Attribute is used to expose the method publicly or enabling method to use. It has some properties like
-Description
-CacheDuration
-MessageName
-TransactionOption
-EnableSession
-BufferResponse

 [WebMethod (Description=" Describe your method name")] 
        public bool SampleLoginMethod(string _mailId, string _passWord)
        {
            DataSet DsCheckLogin = new DataSet();
            sP_Name = "Proc_CheckLogin";  //Your Stored Procedure Name
            SqlConnection sqlCon = new SqlConnection(Con); //setting DB connection here.
            SqlCommand sqlCmd = new SqlCommand(sP_Name, sqlCon);
            sqlCmd.CommandType = CommandType.StoredProcedure;
           //Passing Required parameters.
           sqlCmd.Parameters.Add("@EmailId", _mailId);
            sqlCmd.Parameters.Add("@password", _passWord);
            
            SqlDataAdapter sqlda = new SqlDataAdapter(sqlCmd);
            sqlda.Fill(DsCheckLogin);
         //Getting Back result from your DB.
            if (DsCheckLogin.Tables[0].Rows.Count > 0)
                return true;
            else
                return false;

        }
Execute it. Now you will get 'SampleLoginMethod' and click on it.

Click on 'Invoke' button.


Finally, you will get your result here.


Read More »

Sunday, December 30, 2012

How to create a new Android Emulator with Eclipse


First you have to setup your Eclipse with android sdk.
visit here android setup with Eclipse.


After starting Eclipse,

Click AVD manager icon in toolbar. If you not find it there then go to WINDOWS->Android Virtual Device Manager
Click New in AVD window and fill the form that appears.


Fill Device name, give your device screen size, give the target of device (Device version) and remaining are optional.


Select the device and click Start.........
Launch it.......
Finally you will get this.......


Read More »

Create a first Android project with Eclipse.

In this tutorial, i am going to explain that how to make an first android application or project with Eclipse.First you have to setup your Eclipse with android sdk.
visit here android setup with Eclipse.

Create a First Project with Eclipse

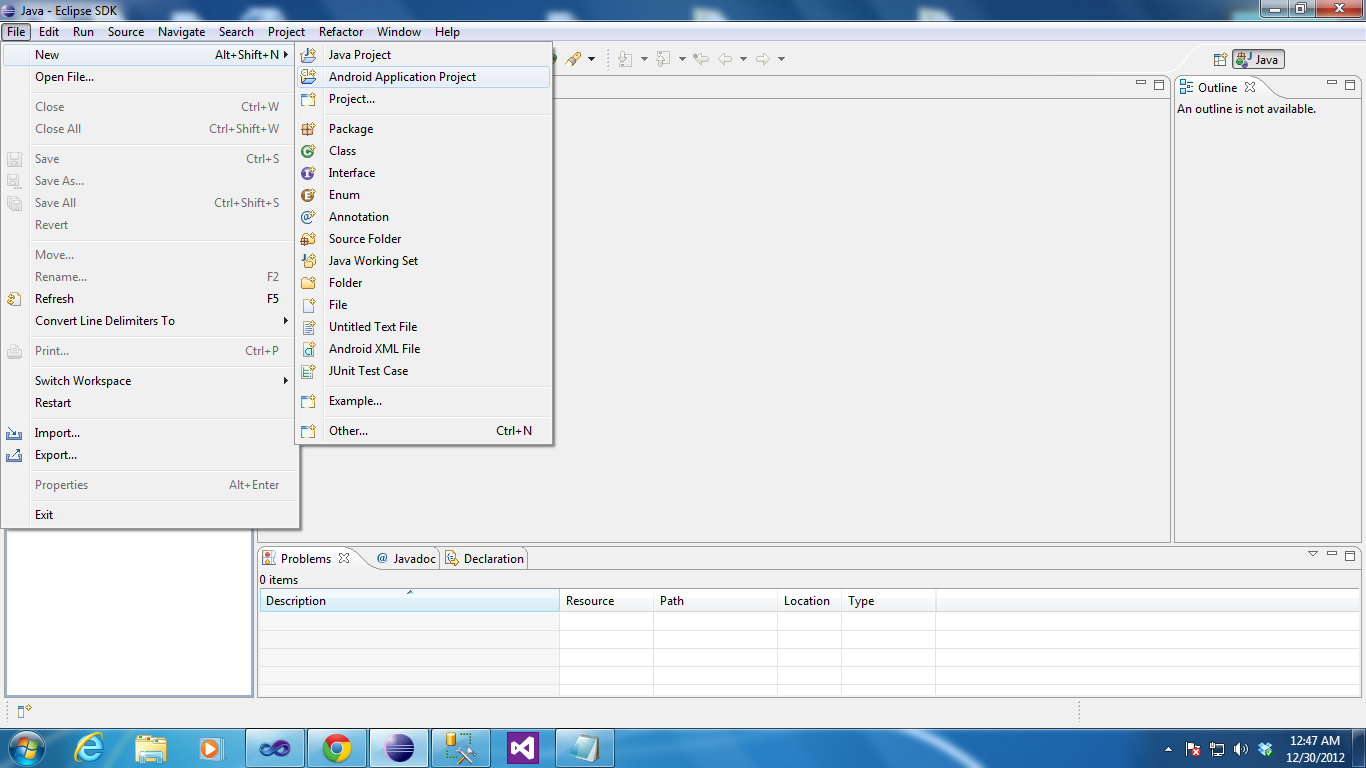
Start Eclipse, Click File->New->Android Application Project.


Fill in the form that appears

1. Application Name is the app name that appears to users. For this project, use "MyFirstApp."
2. Project Name is the name of your project directory and the name visible in Eclipse.
3. Package Name is the package namespace for your app.It should be unique name across the all android app in your system as well as goggle play.
4. Minimum Required SDK is the lowest version of Android that your app supports, indicated using the API Level.
5. Target SDK indicates the highest version of Android with which you have tested with your application(Max version of your app should work).
6. Compile With is the platform version against which you will compile your app. By default, this is set to the latest version of Android available in your SDK.
7. Theme specifies the Android UI style to apply for your app.
Click Next......

Set your app location here and Click Next.

You can choose Launch Icon,Shape and background color for your app and click Next.
Choose your Activity type here and click Next.

Click Finish.

Your app appeared in Package explorer like this...

Run your app in Emulator
Right Click on your project->Run as-> Android Application

You will get output like this......


Launch Icon will appear in home screen like this


Read More »

Thursday, December 27, 2012

Installation of android SDK.

Now it is very easy to install android sdk in your windows.But in older process you have to do lot things like you have download eclipse, Android sdk and then you have setup the ADT plugin. 
Now Android provides you all in-built SDK and make it easy in 2 steps.
Step 1: Download and install java.
Step 2: Download eclipse that having in-built android sdk.

Now you can develop the android apps.........

How to download and install java?

For developing an android app you should have min 1.5 java version. If you don't have download it here.
1. Double click on a downloaded file and install java in the default directory path, C:\Program Files\Java
2. After the installer finish, read and accept the license agreement. For mostly, the typical install will be fine.
3. Then click finish. That is it, your installation complete.
4. And then set the CLASS-PATH and PATH. Copy the java installed directory paths like  "C:\Program Files\Java\jdk1.7.0_05\bin" for System Variable ,
 "C:\Program Files\Java\jdk1.7.0_05\lib" for User variable and follow the below process.

Windows XP
  1. Select Start, select Control Panel. double click System, and select the Advanced tab.
  2. Click Environment Variables. In the section System Variables, find the PATH environment variable and select it. Click Edit. If the PATH environment variable does not exist, click New.
  3. In the Edit System Variable (or New System Variable) window, specify the value of the PATH environment variable. Click OK. Close all remaining windows by clicking OK.
  4. Again click Environment Variables. In the section User Variable, click on new and give the following values.
    Variable name = CLASS and variable value ="the whole path" you copied from lib folder.
  5. Click OK.

     
Windows Vista:
  1. From the desktop, right click the My Computer icon.
  2. Choose Properties from the context menu.
  3. Click the Advanced tab (Advanced system settings link in Vista).
  4. Click Environment Variables. In the section System Variables, find the PATH environment variable and select it. Click Edit. If the PATH environment variable does not exist, click New.
  5. In the Edit System Variable (or New System Variable) window, specify the value of the PATH environment variable. Click OK. Close all remaining windows by clicking OK.
  6. Again click Environment Variables. In the section User Variable, click on new and give the following values.
    Variable name = CLASS and variable value ="the whole path" you copied from lib folder.
  7. Click OK.
Windows 7:
  1. From the desktop, right click the Computer icon.
  2. Choose Properties from the context menu.
  3. Click the Advanced system settings link.
  4. Click Environment Variables. In the section System Variables, find the PATH environment variable and select it. Click Edit. If the PATH environment variable does not exist, click New.
  5. In the Edit System Variable (or New System Variable) window, specify the value of the PATH environment variable. Click OK. Close all remaining windows by clicking OK.
  6. Again click Environment Variables. In the section User Variable, click on new and give the following values.
    Variable name = CLASS and variable value ="the whole path" you copied from lib folder.
  7. Click OK.
Windows 8:

  1. Drag the Mouse pointer to the Right bottom corner of the screen
  2. Click on the Search icon and type: Control Panel
  3. Click on -> Control Panel -> System -> Advanced
  4. Click on Environment Variables, under System Variables, find PATH, and click on it.
  5. In the Edit windows, modify PATH by adding the location of the class to the value for PATH. If you do not have the item PATH, you may select to add a new variable and add PATH as the name and the location of the class as the value.
  6. Close the window.
  7. Reopen Command prompt window, and run your java code.

Thus the complete java installation process.

How to download Android SDK?

Now you no need to download eclipse. You can download Eclipse that built android sdk.
Download link here.
Click on "ADT Bundle for windows", accept the agreement and mark the option that your system supports either 32 or 64-bit. Download and extract it.
Open the Eclipse file and enjoy the coding..................

Read More »