Sunday, May 19, 2013

Push Messages to GCM server using c#.net application (server side).

      Google Cloud Messaging (GCM) is a service that helps developers send data from servers to their Android applications on Android devices. Google Cloud Messaging (GCM) replaces the beta version of Android Cloud to Device Messaging (C2DM).
The free service has the ability to send a lightweight message informing the Android application of new data to be fetched from the server. Larger messages can be sent with up to 4 KB of payload data.

This tutorial explains about how to send message to GCM server using .net application. Then GCM server pushes the messages to particular devices.
1. First, create new web application (File/new/website/Asp.Net Empty web site).
2. Design your page like below


 Data Post Format


{   "collapse_key": "score_update",     "time_to_live": 108,       "delay_while_idle": true,
     "data": {
     "score": "223/3",
     "time": "14:13.2252"
                  },
     "registration_ids":["4", "8", "12", "16", "25", "38"]
}

collapse_key             = Message type                                                                          
time_to_live               = How long (in seconds) the message should be kept on     
                                                              GCM storage if the device is offline (default:4 weeks).       
delay_while_idle       = It indicates that the message should not be sent                  
                                                                immediately if the device is idle. The server will                 
                                                                wait for the device to become active, and then only the     
                                                                last message for each collapse_key value will be sent      
data                             = Message Paylod.                                                                                            
 registration_ids         = A string array with the list of devices (registration IDs)
                                                               receiving the message. It must contain at least 1 and at     
                                                               most 1000 registration IDs. To send a multicast message,    
                                                               you must use JSON. 


3. Write a method in OnClick() function of send button. The code follows


protected void SubmitButton1_Click(object sender, EventArgs e)                                                             
        {                                                                                                                                                  
         AndroidPush();  // calling android push method                                                                               
        }                                                                                                                                                  
                                                                                                                                                           
//Android push message to GCM server method                                                                                       
private void AndroidPush()                                                                                                                      
        {                                                                                                                                                   
 // your RegistrationID paste here which is received from GCM server.                                                               
       string regId = "APA91bG_xxxxxxxxxxxxxxxxxxxxxxxxxxxxxxxxxxxxxxxxxxxxxxxxx_V6hO2liMx-                   
                           eIGAbG2cR4DiIgm5Q";                                                                                              
 // applicationID means google Api key                                                                                                     
       var applicationID = "AIzaSyDScBxxxxxxxxxxxxxxxxxxxpv66IfgA";                                                         
// SENDER_ID is nothing but your ProjectID (from API Console- google code)//                                          
                var SENDER_ID = "77xxxxx625";                                                                                            

                var value = Text1.Text; //message text box                                                                               

                WebRequest tRequest;                                                                                                           

                tRequest = WebRequest.Create("https://android.googleapis.com/gcm/send");                             

                tRequest.Method = "post";                                                                                                       

                tRequest.ContentType = " application/x-www-form-urlencoded;charset=UTF-8";                             

                tRequest.Headers.Add(string.Format("Authorization: key={0}", applicationID));                              

               tRequest.Headers.Add(string.Format("Sender: id={0}", SENDER_ID));                                         

         //Data post to server                                                                                                                                         
         string postData =     
              "collapse_key=score_update&time_to_live=108&delay_while_idle=1&data.message="         
               + value + "&data.time=" + System.DateTime.Now.ToString() + "&registration_id=" +      
                  regId + ""; 


                Byte[] byteArray = Encoding.UTF8.GetBytes(postData);                                                

                tRequest.ContentLength = byteArray.Length;                                                                  

               Stream dataStream = tRequest.GetRequestStream();                                                    

               dataStream.Write(byteArray, 0, byteArray.Length);                                                          

               dataStream.Close();

               WebResponse tResponse = tRequest.GetResponse();                                                  

               dataStream = tResponse.GetResponseStream();                                                            

              StreamReader tReader = new StreamReader(dataStream);                                          

              String sResponseFromServer = tReader.ReadToEnd();   //Get response from GCM server.

               Label3.Text = sResponseFromServer;      //Assigning GCM response to Label text 

                 tReader.Close();                                                                                                                    

                dataStream.Close();                                                                                                             
                tResponse.Close();                                                                                                              
               }                                            


Note: The above code is for sending single regID. To send mutiple regID's, you can send up-to 1000 regID's to google server once or you can loop the code.  
                                  
4. After clicking send button you will get response from GCM server like id=343kdhgsy4y32i42@adfgd. It means that you successfully sent message to GCM server.


  You will get message in your mobile like this..


For GCM Client side tutorial click here. Download the GCM C# server side code below.


Enjoy coding.....


Read More »

Saturday, May 18, 2013

How to create Facebook Hash key for android apps ?

After a lot of search i found that how to create Facebook hash key for android apps in both modes i.e debug and release modes.

 Steps to create Hash key:

 1. First download oppenssl. click here to download openssl for windows. Download either 32 bit or 64 bit according to your system requirement.
  2. Extract and copy it to your specific location.
 There are two processes to generate Facebook hash-key. one is from command prompt and another via code.

Process 1(Command prompt): 

3. Firstly, open your cmd prompt and change your directory to your java jdk path.

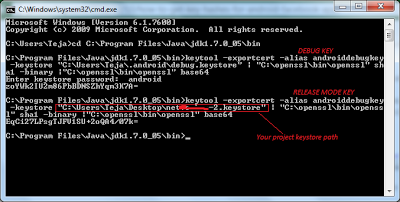
4. Find debug.keystore from your android sdk install path like C:\Users\Teja\.android\debug.keystore. In case of RELEASE MODE key, copy  yourProject.keystore. This one more important to generate your perfect hash key. Otherwise you will get an error like APP MISS_CONFIGURED.

5. And then find your openssl\bin copied & extracted location.

And follow the sample cmd prompt below:

 C:\Program Files\Java\jdk1.7.0_05\bin>keytool -exportcert -alias androiddebugkey -keystore "C:\Users\Teja\.android\debug.keystore" | "C:\Openssl\bin\openssl" sha1 -binary |"C:\Openssl\bin\openssl" base64

6. Run it and provide some password like 'android'. It will generates you hash key like below..


Process 2 (Using method call from android code):

Use below code snippet to get hash key.
public void onCreate(Bundle savedInstanceState) {
    super.onCreate(savedInstanceState);

    // Add code to print out the key hash

    try {
        PackageInfo info = getPackageManager().getPackageInfo(
                "com.facebook.sample.facebook",  //Replace your package name here
                PackageManager.GET_SIGNATURES);
        for (Signature signature : info.signatures) {
            MessageDigest md = MessageDigest.getInstance("SHA");
            md.update(signature.toByteArray());
            Log.d("KeyHash:", Base64.encodeToString(md.digest(), Base64.DEFAULT));
            }
    } catch (NameNotFoundException e) {

    } catch (NoSuchAlgorithmException e) {


    }

Save your changes and re-run the sample. Check your log-cat output for a message similar to this:

Note: For release key, run your apk with eclipse then you will get hash key like above.

7. Paste your Facebook Hash key in your Facebook app (https://developers.facebook.com/apps)
8. Go to Native Android Apps and paste your hash key in there.


Enjoy with your first android  Facebook app..........  
Read More »